The first of two small warbands that I’ve created for use in skirmish games like Song of Blades and Heroes, here we have the ultimate bad guys – the warriors of darkness!
As with all my 15 mm miniatures, I’ve made these available for anyone that would like to get hold of them via Shapeways.
A bit of a mixed bag here. The two heavily armoured warriors were sculpted over a year ago with the rest of the warband being more recent. I think it probably shows a bit in the poses!
I’m really pleased with how the leader of the force, known only as the Relentless, has turned out. I had to go through quite a few iterations before all the details printed nicely but it was worth it in the end. It was great fun painting the demonic shoulder pad and the chipped shiny red armour. The largest chips are sculpted, but I added a few smaller ones with the brush.
I shared this guy previously, so you can see more of him here. Every good fantasy warband needs a magic user!
The heavily armoured elite. You don’t want to mess with these guys! Again, you can see how well the black high def acrylate captures very fine details – the chainmail loincloths are incredibly tiny.
The lowly savages can’t afford as much armour as their brethren but they make up for it with muscle.
Just a couple of shots to try and give a better idea of the scale of these guys. I’m conscious that they may look a little rough blown up to five times actual size, but they look great in the hand (honest 😉 ). I don’t fancy that stormcast’s chances!
I took some work in progress photos while I was painting one of the savages, so I intend to write a future post documenting that process (I have to finish up the dark sword tutorial first). In the meantime, here are some of the main colours used:
Red armour
Basecoat: khorne red (GW)
Highlight: squig orange (GW):white 1:1, then add more white
Shade: Add black to khorne red
Glaze: Evil sunz scarlet (GW) and khorne red
NMM bronze
Basecoat: dark flesh (GW):vermin brown (GW) 1:1
Highlight: orange brown (VMC):creamy ivory (reaper) 1:1, then add more creamy ivory
I’m going to write a few posts describing how I go about a painting project in the hope that it will be useful and as something I can point people at when I get questions. This is just how I go about things. It’s probably not the best way or the most efficient way – of course you should use whatever works for you!
Throughout this I’ll assume that we’re interested in painting at the highest level. If I’m doing a quick piece for tabletop then I don’t go to these lengths.
I’ve recently accepted a commission to paint up a Dark Sword miniature, so I’ll be using that to illustrate each stage.
This post will cover the steps that I take to get to the point where the miniature is ready to paint. I’m sure it will be old hat to most people but I think it’s important to emphasise the importance of getting this stage right.
Planning
Regular readers will know that I sometimes don’t plan projects as thoroughly as I should. But with a commission it’s important to ensure that the finished piece will be in line with the client’s expectations.
For this project there was a fairly clear direction and I was provided with an example colour scheme and theme and asked to make it work with the Dark Sword miniature.
The miniature chosen was “male cleric with 2 handed mace” (DSM7447) from the Visions in Fantasy line, but the mace was to be replaced with the sword from “male knight with weapon assortment” (DSM7202).
I sketched the miniature and tested the colours on paper. This is a very quick way to ensure that the finished piece will work.
After showing this to the client I submitted it to the Tate Gallery but curiously I haven’t heard anything back yet.
In this case I wasn’t too sure what to do with the integrated base but as this character was to be painted up as a member of House Targaryen from Game of Thrones, the client suggested more of a reddish colour as though he were one of the three guardians from the tower of joy.
Surface preparation
My best results have always come when I’ve really taken the time to ensure that the surface of the miniature is as smooth as possible before starting painting. My approach relies a fair bit on glazing and this doesn’t work all that well when the surface is rough. Happily with the modern plastics from GW the prep is greatly reduced. But even here there can sometimes be small imperfections – very shallow surface cracks for example, or areas where the sprue has attached to the model.
Metal miniatures almost always have a slightly rough surface due to the metal contracting as it cools following casting. For these after cleaning up flash and mould lines I’ll start by sanding with 400 grit paper, being very careful not to damage any of the details. It’s the largest surfaces that are most critical to get smooth. This step will make it obvious where any pits are since they will be dull against the rest of the surface, which will start to be more shiny.
For both metal and plastic I fill in any recesses using either liquid greenstuff (if shallow) or milliput (if not). I try to allow a day for full hardening and work on something else before returning with 800 grit sandpaper. It’s possible that the surface will still not be fully flat, in which case I repeat the filling and sanding process until I’m happy.
Conversion and preparation complete. I had to re-sculpt some of the armour edges with a green stuff and milliput mix because they are very fine and hadn’t cast properly.
What about resin? My preferred approach with resin is not to buy it in the first place! Maybe I’ve been unfortunate, but pretty much all the resin I’ve seen has suffered to a greater or lesser degree from surface roughness, warping, mould lines through very fine details and air bubbles. If I’m forced to work with it I try to clean it up in a similar way to metal but being even more careful because the stuff is so damn fragile.
Once I’m happy to start painting I always give my miniatures a gentle scrub with a toothbrush in warm soapy water. I’ll generally have been handling them a lot up until this point and I don’t want any oils from my grubby mitts messing with the paint. After they’ve been washed I avoid handling the miniatures as much as possible. Generally I’ll mount them on either an old paint pot or a pin vice and hold that during painting.
Priming
For plastic minis I don’t bother with priming. I’m painting for display and I’ve never had a problem with paint adhering. Adding a priming step is just an opportunity for that carefully honed surface to become rough.
For metal and resin I use Vallejo surface primer, usually grey although I also have black and white. Sometimes I put this through my airbrush, but I find it has a tendency to clog up quite quickly so I often prefer to put it on with a large brush. Just a thin layer is fine – I’m not looking for a uniform coverage at this point.
For this miniature the obvious primer choice was black, so I put down a thin layer with a large brush. At this point I gave the miniature another inspection – some imperfections can become more visible once the shine of the bare metal is removed.
All looked good for this miniature, so I went ahead and put some basic colours down for the base. I was drybrushing so I wanted this out of the way before I started work on the miniature. You can see that a bit of paint has found it’s way onto his boots. I may well go back and refine the base later, but the potentially messy stuff is out of the way now.
Shapeways have made their black hi-def acrylate available to shoppers so I have retired the detail plastics from my shop and replaced them with the new material.
This material is really nice for miniatures, as it’s much less grainy than the detail plastics and captures small details really well. It’s a plastic so it’s nice and easy to work with too (less brittle). There are still some slight print lines visible but they can either be ignored or taken care of with a light going over with 400 or 800 grit sandpaper.
And as a final bonus, it’s about a third cheaper too!
Back in the day I had a part time job as the admiral of a mighty Bretonnian Man O’ War fleet that ruled the waves of my bedroom carpet. I’ve always retained a fondness for fantasy naval vessels, so I suppose it was inevitable that I’d try my hand at making a few.
The renders here are a selection of the ships that I’ve created in blender. Blender is really good for this kind of hard surface modelling and it was great fun coming up with various designs.
I’ve printed most of these at Shapeways, but I haven’t had enough time to put any paint on them as yet. Too many projects and not enough time! These are firmly on the back burner while I work on figure sculpting.
The ships are roughly 1:600 scale, which is larger than Man O’ War but I found this to be a nice size to get all the details I wanted to include to print nicely. Each ship is split into at least 2 pieces that I think would probably be castable, but it’s not something I intend to explore.
You may not be able to make out the spokes on the wheels of these human ships, but they actually print really well!
Elves – of course! My thinking was that they’d have some powerful magic users, hence the obelisks of power at the stern and the arcane dais on the catamaran.Dragon ships. The heads at the front breath fire, which is best avoided if you’re in a wooden ship…This demonic vessel uses a combination of wind and slave power to ram enemies, and has an unholy portal mounted amidships through which unspeakable things can be summoned to assist in boarding!
A few more of my own sculpts fresh off the painting table. These were actually sculpted about a year ago but I only just got round to doing something with them.
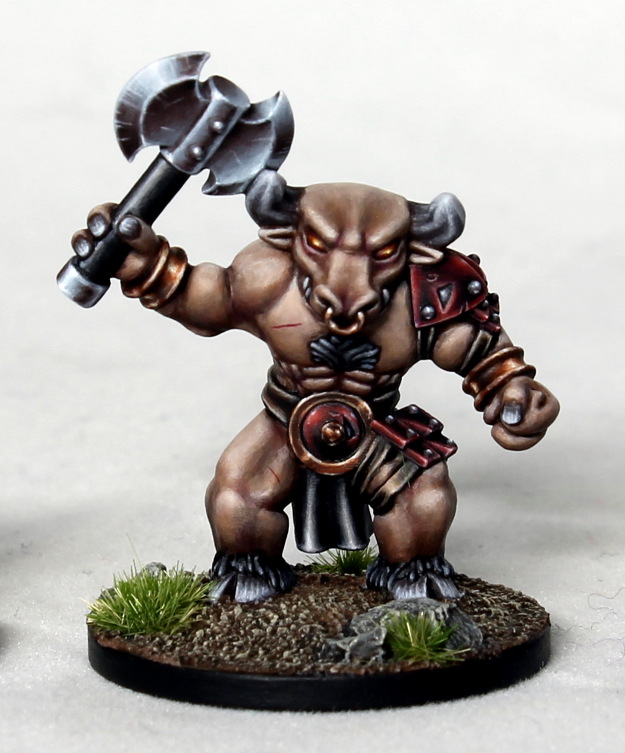
Quite a range of sizes with this trio as the goblin is only 11 mm to the eyes, whereas the minotaur is a far more imposing 21 mm and is therefore mounted on a 2 pence piece, as befits his status. 😉
One of the many reasons I like this scale is that it gives me the opportunity to create some relatively large beasties without the costs becoming too ridiculous. I definitely intend on doing some more in this vein in the future.
I’m currently sculpting a small elf warband for use in skirmish games like Songs of Blades and Heroes but I think I’m likely to do something similar for the greenskins in the not too distant future, so the orc and goblin are useful concepts for that.
I’m making these available in frosted detail on Shapeways. Recently there have been hints on the forum that the high definition acrylate material will be rolled out for general use fairly soon, which would be really good news.
Main colours used
Green skin
Base: warpstone glow (GW)
Highlight: scorpion green (GW) with a touch of creamy ivory (reaper), add more creamy ivory
Shade: caliban green (GW), black
Yellow armour
Base: khemri brown (GW), then golden yellow (GW)
Shade: dark flesh (GW)
Highlight: creamy ivory (reaper) with a touch of flash gitz yellow (GW)
Glaze with flash gitz
Minotaur skin
Basecoat: tallarn flesh (GW) and calthan brown (GW) 1:1
Shade: rhinox hide (GW) and black 1:1
Highlight: tallarn flesh, then add in yellowed bone (reaper). Final highlight yellowed bone and white 1:1
Glaze wazdakka red (GW) and liche purple (GW) into recesses
Minotaur armour
Basecoat: black
Highlight: khorne red (GW) and white 2:1, white with a touch of squig orange (GW)
Glaze with khorne red, evil sunz scarlet (GW) and squig orange
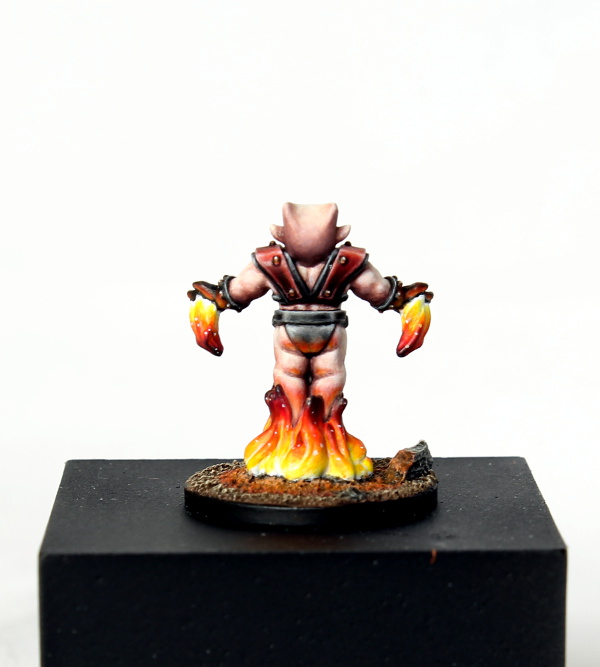
When I started sculpting my 15 mm guys, I was envisaging a little game involving the four heroes against various classic fantasy baddies that could be played on a coffee table. The idea was that these would be brought into being by an arch villain: the summoner.
As often happens I lost my way with that project, although I do have various evil henchmen sitting around waiting for a bit of paint. I’ll get round to that eventually, but since I have actually painted the head honcho himself I thought it was worth sharing.
With this miniature I wanted to convey the impression that he is mid-summon, floating above the ground wreathed in infernal flames. I do have a nagging feeling that he might look more like he’s being immolated, but there’s not much I can do about that now!
I decided to paint some object source lighting on this piece, as I thought it would help sell the flame effect. I’m not generally a big fan of OSL as I find it often seems to photograph better than it looks in the hand. But I’m reasonably pleased with the result here – especially on the metallic bits around his waist. I suppose I could photograph him against a darker background to make it look better in the pictures.
I’ll make him available on my shapeways shop soon…
A couple of gratuitous shots for scale:
Colours used as follows:
Armour
Basecoat: khorne red
Highlight: squig orange and white
Shade: Add black to khorne red
Glaze with evil sunz scarlet and khorne red
NMM bronze
Basecoat: 1:1 dark flesh and vermin brown
Highlight: 1:1 orange brown and creamy ivory, add more creamy ivory
Shade: rhinox hide, black
Flame
Basecoat white, build up colours with flash gitz yellow, trollslayer orange, evil sunz scarlet, black
 The first of two small warbands that I’ve created for use in skirmish games like Song of Blades and Heroes, here we have the ultimate bad guys – the warriors of darkness!


 The heavily armoured elite. You don’t want to mess with these guys! Again, you can see how well the black high def acrylate captures very fine details – the chainmail loincloths are incredibly tiny.
 The lowly savages can’t afford as much armour as their brethren but they make up for it with muscle.
 Just a couple of shots to try and give a better idea of the scale of these guys. I’m conscious that they may look a little rough blown up to five times actual size, but they look great in the hand (honest 😉 ). I don’t fancy that stormcast’s chances!